Compose UI
Kotlin 멀티플랫폼 프레임워크이며 Composable 함수를 통해 UI를 방출하는 구현을 제공
Compose Runtime과 UI를 통합할 때의 목표
화면의 레이아웃 트리를 구축하는 것
트리에 사용되는 노드 타입은 Compose UI만 알고 런타임은 알지 못한다
그래서 런타임은 트리에서 노드의 작업(삽입, 제거, 이동 등)을 Client 라이브러리에 위임
초기 Composition 과정에서는 변경 목록이 모든 노드를 삽입하여 레이아웃 트리를 구축하고
Recomposition 과정에서 변경 목록은 트리를 업데이트 한다
이 과정에 대해 자세히 살펴보자
예약된 변경 목록을 실제 트리의 변경 목록으로 매핑
(Mapping scheduled changes to actual changes to the tree)
Composable 함수가 실행될 때 함수는 변경 사항을 방출(emit)한다
이 때, Composition이라는 side table이 사용된다
Composition (side table)
Composable 함수의 실행을 실제 노드 트리의 변경으로 매핑하는 것과 관련된 정보를 가진다
Compose UI를 사용하는 Application은 표현해야 할 노드 트리의 수만큼 Composition을 가질 수 있다
(앞으로 side table은 대문자를 사용하는 Composition이라고 표현하고
Composable 함수를 실행하고 UI를 나타내는 트리 구조를 출력하는 행위는 소문자 composition이라고 표현)
Compose UI 관점에서의 Composition (Composition from the point of view of Compose UI)
안드로이드에서는 setContent 호출 시 Compose UI 라이브러리에서 런타임으로의 진입점 발생
// Activity, Fragment에서의 setContent 호출
class MainActivity : ComponentActivity() {
    override fun onCreate(savedInstanceState: Bundle?) {
        super.onCreate(savedInstanceState)
        enableEdgeToEdge()
        setContent {
            MaterialTheme {
                Text("Hello Compose")
            }
        }
    }
}

// View 계층에서 호출될 경우 (View + Compose 같이 사용 시)
ComposeView(this).apply {
    setContent {
        MaterialTheme {
            Text("Hello Compose")
        }
    }
}
setContent 함수는
새로운 Root Composition을 생성하고, 가능한 한 재사용
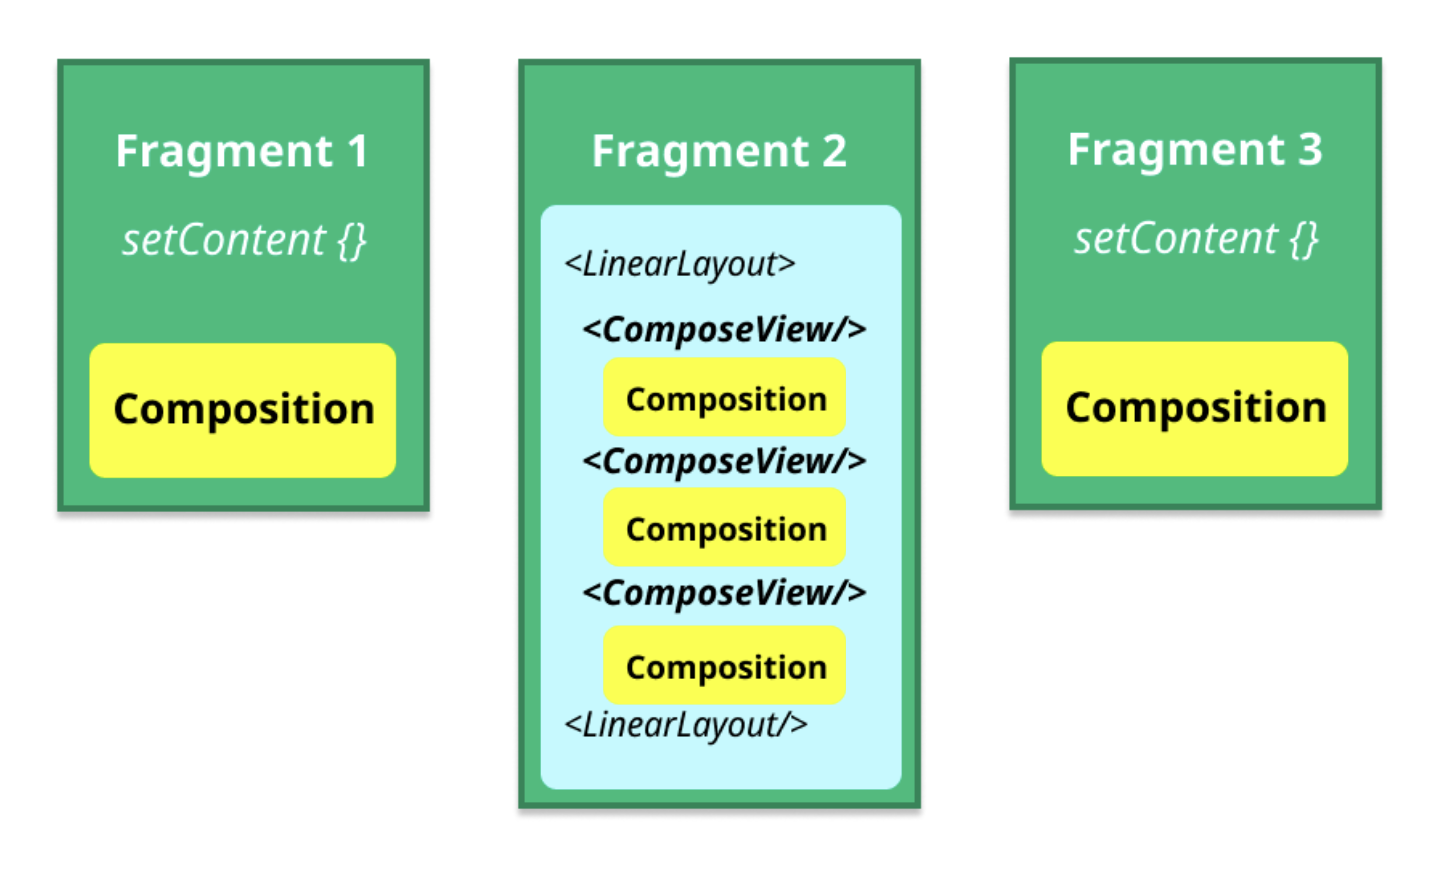
Composition은 각각 독립적인 Composable 트리를 호스팅하고 Composition들은 서로 연결되어 있지 않다
예시) 3개의 Fragment를 가진 App (총 5개의 Composition을 가짐)
Fragment1, Fragment3은 setContent 함수를 통해 Composable 트리 연결
Fragment2는 ComposeView를 통해 setContent 호출
레이아웃 계층을 생성하기 위해 Composer가 composition 과정(side table X)을 실행
이 과정에서 모든 Composable 함수가 실행되고 변경 사항 방출
LayoutNode는 UI 요소를 나타내는 노드 타입이기에 Root Composition에 자주 쓰인다
모든 Layout Composable은 Composition으로 LayoutNode 타입의 노드를 방출하는데 ReusableComposeNode가 사용된다
@UiComposable
@Composable
inline fun Layout(
    content: @Composable @UiComposable () -> Unit,
    modifier: Modifier = Modifier,
    measurePolicy: MeasurePolicy
) {
    val compositeKeyHash = currentCompositeKeyHash
    val localMap = currentComposer.currentCompositionLocalMap
    val materialized = currentComposer.materialize(modifier)
    ReusableComposeNode<ComposeUiNode, Applier<Any>>(
        factory = ComposeUiNode.Constructor,		// Node 생성
        update = {					// Node 초기화
            set(measurePolicy, SetMeasurePolicy)
            set(localMap, SetResolvedCompositionLocals)
            @OptIn(ExperimentalComposeUiApi::class)
            set(compositeKeyHash, SetCompositeKeyHash)
            set(materialized, SetModifier)
        },
        content = content
    )
}


val Constructor: () -> ComposeUiNode = LayoutNode.Constructor

// 노드가 처음 생성되거나 마지막으로 기억된 이후 값이 변경된 경우에만 람다 실행
fun <V> set(
    value: V,
    block: T.(value: V) -> Unit
) = with(composer) {
    if (inserting || rememberedValue() != value) {
        updateRememberedValue(value)
        composer.apply(value, block)
    }
}
재사용 가능 노드
Compose Runtime의 최적화 기능
Node의 key가 변경될 때 Composer가 recompose 하도록 한다
Composition은 실제로 recompose 때와 같이 슬롯 테이블을 탐색한다
ReusableComposeNode
재사용 가능한 그룹을 생성하고 고유한 키를 할당해 식별할 수 있도록 한다
@Suppress("NONREADONLY_CALL_IN_READONLY_COMPOSABLE")
@Composable
inline fun <T : Any?, reified E : Applier<*>> ReusableComposeNode(
    noinline factory: () -> T,
    update: @DisallowComposableCalls Updater<T>.() -> Unit,
    content: @Composable () -> Unit
) {
    if (currentComposer.applier !is E) invalidApplier()
    currentComposer.startReusableNode()
    if (currentComposer.inserting) {
        currentComposer.createNode(factory)
    } else {
        currentComposer.useNode()
    }
    Updater<T>(currentComposer).update()

    content()

    currentComposer.endNode()
}
Compose UI 관점에서의 Subcomposition (Subcomposition from the point of view of Compose UI)
Subcomposition
Composable 트리의 더 깊은 수준에서 생성되는 Composition으로 부모 Composition과 연결
각 Composition은 부모 Composition을 나타내는 부모의 CompositionContext에 대한 참조를 가진다
Subcomposition을 만드는 이유
- 초기 composition 과정에서 특정 정보를 알 때까지 연기하기 위해
- 하위 트리에서 생성되는 노드의 타입을 변경하기 위해
Subcomposition 특징
- 초기 composition이 일어나는 시점 제어
- 부모 Composition과 독립적으로 recompose 가능
- Subcomposition에서 읽은 state가 변경되면 초기 composition이 수행된 후 부모 Composition에 대한 recomposition 예약
- 기술적으로 서브 트리에서 다른 노드 타입 지원 가능
초기 Composition 과정의 지연 (Deferring initial composition process)
SubcomposeLayout을 통해 알아보자
SubcomposeLayout
Layout과 유사하지만 레이아웃 단계에서 독립적인 Composition을 생성하고 실행하는 특별한 컴포넌트
SubcomposeLayout 특징
- 레이아웃 단계가 발생할 때마다 매개변수가 변할 수 있고 Recomposition 될 수 있다
- 자식 Composable이 이전에 계산된 값에 의존하도록 할 수 있다
- LayoutNode를 방출하고, 서브 트리의 노드 타입은 부모와 동일하다
- BoxWithConstraints 등에서 사용
BoxWithConstraints
@Composable
@UiComposable
fun BoxWithConstraints(
    modifier: Modifier = Modifier,
    contentAlignment: Alignment = Alignment.TopStart,
    propagateMinConstraints: Boolean = false,
    content: @Composable @UiComposable BoxWithConstraintsScope.() -> Unit
) {
    val measurePolicy = rememberBoxMeasurePolicy(contentAlignment, propagateMinConstraints)
    SubcomposeLayout(modifier) { constraints ->
        // 제약 조건을 content block에 제공
        val scope = BoxWithConstraintsScopeImpl(this, constraints)
        val measurables = subcompose(Unit) { scope.content() }
        with(measurePolicy) { measure(measurables, constraints) }
    }
}

@Stable
interface BoxWithConstraintsScope : BoxScope {
    val constraints: Constraints
    val minWidth: Dp
    val maxWidth: Dp
    val minHeight: Dp
    val maxHeight: Dp
}

private data class BoxWithConstraintsScopeImpl(
    private val density: Density,
    override val constraints: Constraints
) : BoxWithConstraintsScope, BoxScope by BoxScopeInstance {
    override val minWidth: Dp get() = with(density) { constraints.minWidth.toDp() }
    override val maxWidth: Dp get() = with(density) {
        if (constraints.hasBoundedWidth) constraints.maxWidth.toDp() else Dp.Infinity
    }
    override val minHeight: Dp get() = with(density) { constraints.minHeight.toDp() }
    override val maxHeight: Dp get() = with(density) {
        if (constraints.hasBoundedHeight) constraints.maxHeight.toDp() else Dp.Infinity
    }
}
예시) 제공되는 maxHeight
BoxWithConstraints {
    val rectangleHeight = 100.dp
    if (maxHeight < rectangleHeight * 2) {
        Box(Modifier.size(50.dp, rectangleHeight).background(Color.Blue))
    } else {
        Column {
            Box(Modifier.size(50.dp, rectangleHeight).background(Color.Blue))
            Box(Modifier.size(50.dp, rectangleHeight).background(Color.Gray))
        }
    }
}
서브 트리의 노드 타입 변경 (Changing the node type in a subtree)
Subcomposition은 서브 트리에서 완전히 다른 노드 타입을 지원할 수 있게 한다
벡터 그래픽의 Subcomposition 구현
- 벡터 Composable은 자체 Subcomposition을 생성
- Subcomposition은 일반 UI 요소와 다른 VNode라는 특별한 노드 타입을 사용
@Composable
fun MenuButton(onMenuClick: () -> Unit) {
    Icon(
        painter = rememberVectorPainter(image = Icons.Rounded.Menu),
        contentDescription = "Menu button",
        modifier = Modifier.clickable { onMenuClick() }
    )
}

@Composable
fun rememberVectorPainter(image: ImageVector): VectorPainter {
    val density = LocalDensity.current
    return remember(image.genId, density) {
        createVectorPainterFromImageVector(
            density,
            image,
            GroupComponent().apply {
                createGroupComponent(image.root)
            }
        )
    }
}

// VNode 사용
class VectorPainter internal constructor(
    root: GroupComponent = GroupComponent()
) : Painter() { ... }

internal class GroupComponent : VNode() { ... }
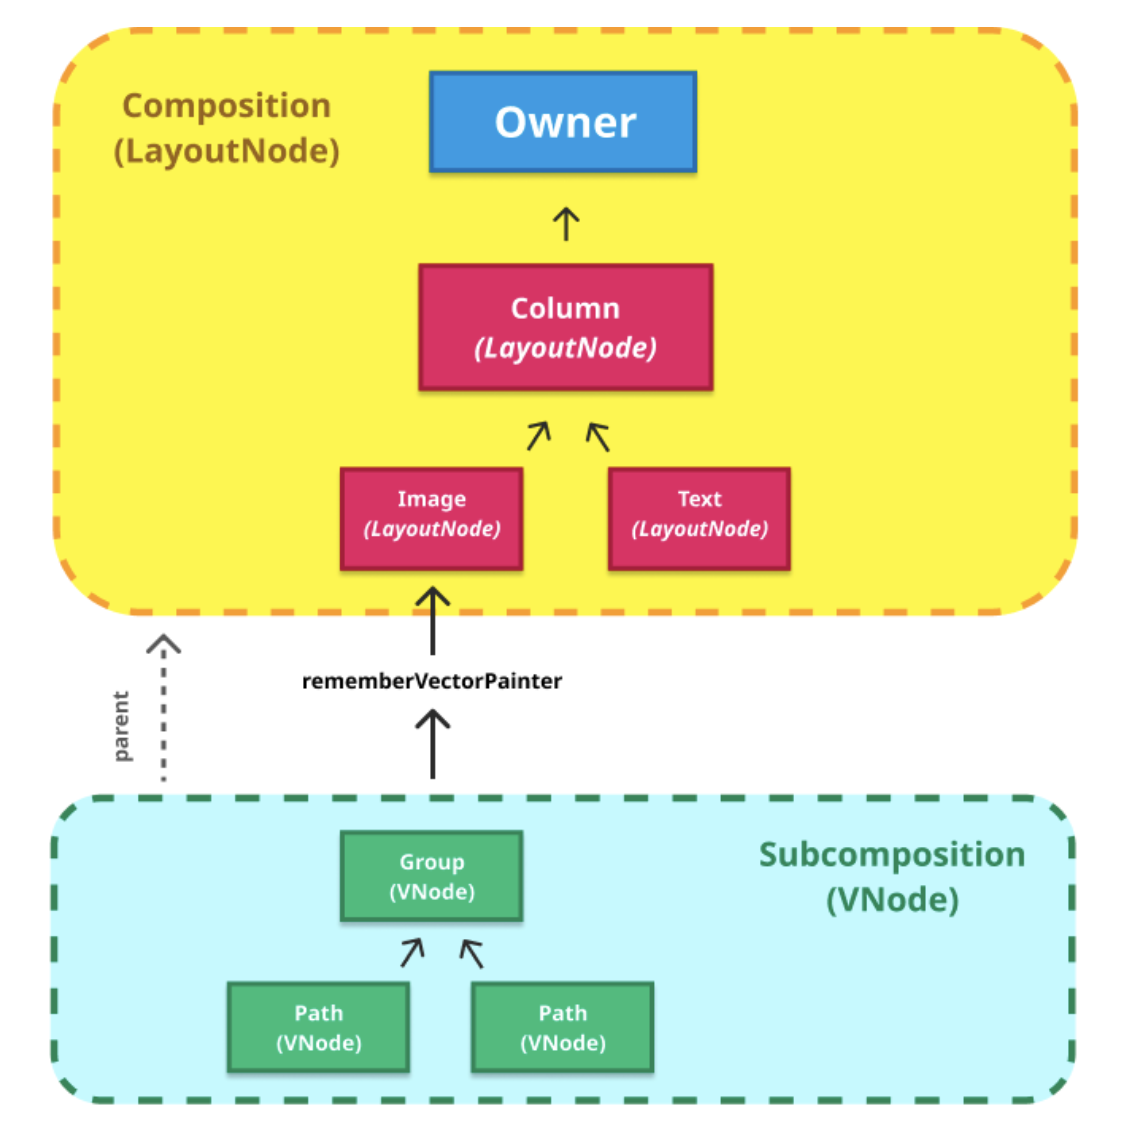
벡터를 포함하는 Composable인 Icon은 LayoutNode를 방출하는 일반 Layout
VectorPainter는 VNode를 사용하는 자체 Subcomposition 생성
이 Subcomposition은 부모 Composition(LayoutNode)에 연결
UI에 변경사항 반영하기 (Reflecting changes in the UI)
구체화 (Materialization)
발생한 모든 변경사항들을 실제 UI에 반영하는 것
다양한 타입의 Applier들 (Different types of Appliers)
Applier는 런타임이 트리의 변경사항을 구체화하기 위해 의존하는 추상화
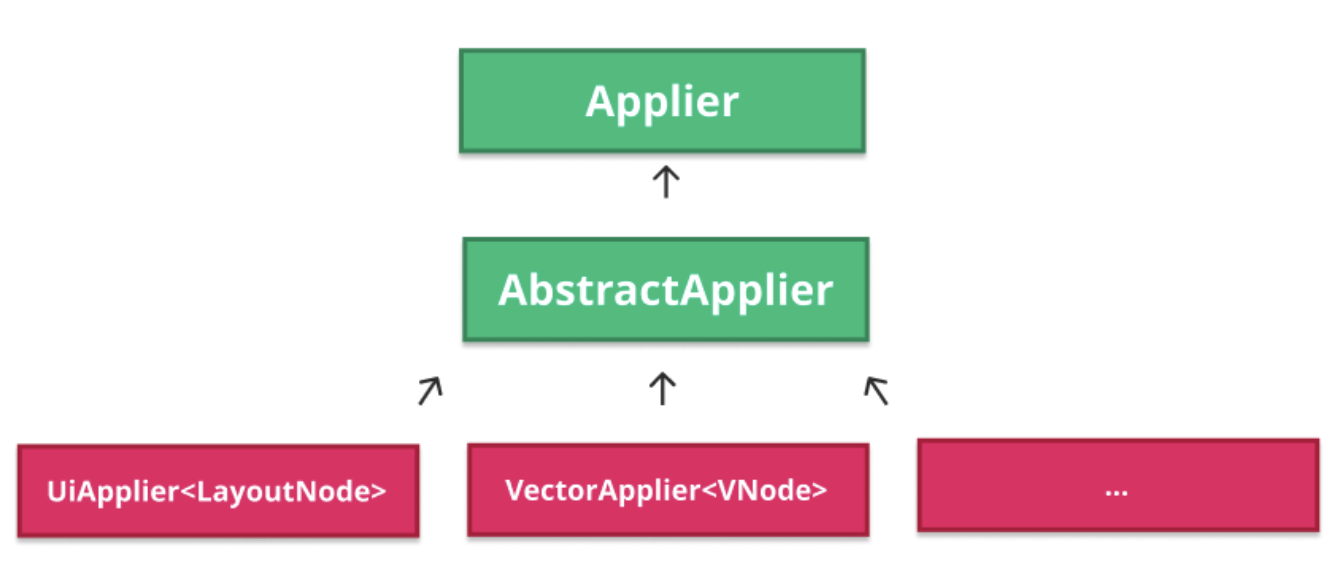
Applier와 AbstractApplier는 Compose Runtime의 일부
AbstractApplier
abstract class AbstractApplier<T>(val root: T) : Applier<T> {
    // 방문한 노드를 스택에 저장
    private val stack = mutableListOf<T>()

    // 현재 방문 중인 노드에 대한 참조
    override var current: T = root
        protected set

    // 새로운 노드 방문 시
    override fun down(node: T) {
        stack.add(current)
        current = node
    }

    // 하위 노드 탐색을 마치고 부모로 다시 돌아갈 시
    override fun up() {
        check(stack.isNotEmpty()) { "empty stack" }
        current = stack.removeAt(stack.size - 1)
    }

    ...
}
예시) condition이 변경될 시 Applier가 동작하는 방식
Column {
    Row {
        Text("Hello Compose")
        if (condition) {
            Text("Hello Android")
        }
    }
    if (condition) {
        Text("Hello Compose Android")
    }
}
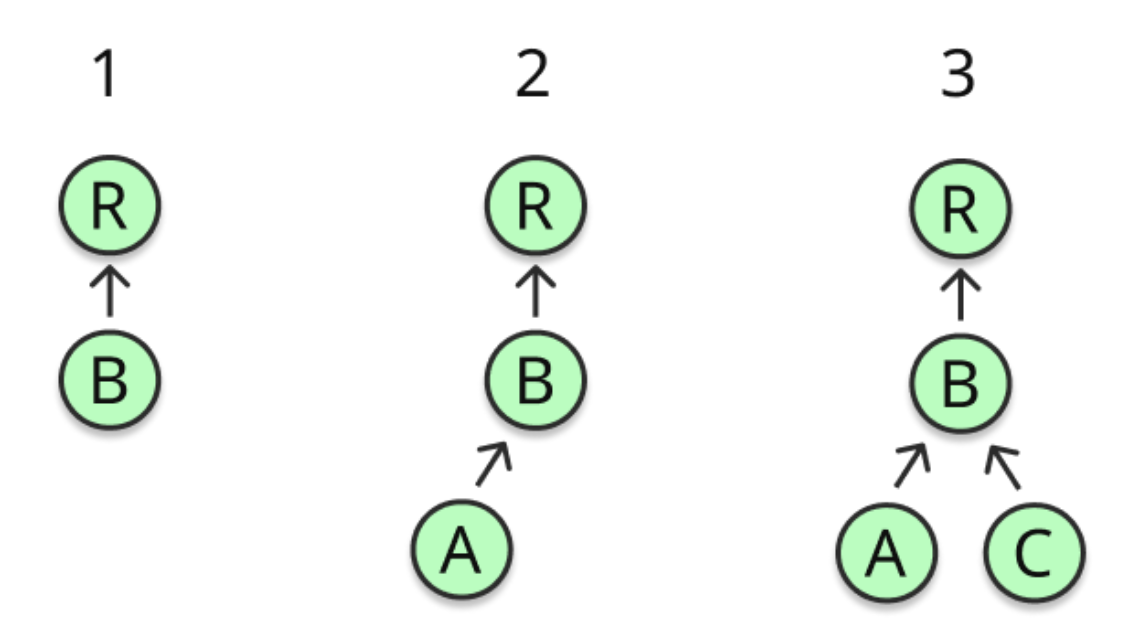
- Column에 대한 down 호출을 받음
- Row로 들어가기 위한 또 다른 down 호출을 받음
- 선택적 자식인 Text에 대한 삭제 작업 수행
- 부모(Column)로 돌아가기 위해 up 호출을 받는다
- 두 번째 조건부 Text에 대한 삭제(또는 삽입) 작업 수행
Compose UI는 Compose Runtime과 Android 플랫폼을 통합하기 위해 AbstractApplier의 2가지 구현을 제공
방문하는 노드의 유형에 따라 다른 Applier 구현이 사용된다
UiApplier
대부분의 안드로이드 UI를 렌더링하는데 사용
노드 타입을 LayoutNode로 고정
상향식 삽입 방식 (중복 알림 피하기 위해)
새 노드가 삽입될 때마다 오직 직속 부모에게만 알림을 보냄
VectorApplier
벡터 그래픽을 렌더링하는데 사용
노드 타입을 VNode로 고정
하향식 삽입 방식
새 노드 삽입 시 모든 조상에게 알림을 보냄 (벡터에서는 어떤 노드에게도 알림을 전파할 필요가 없어 성능 이슈가 없다)
다음으로는 위 2가지 Applier 구현이 UI에서 변경을 구체화하는 방법을 알아보자
새로운 LayoutNode를 구체화 하기 (Materializing a new LayoutNode)
UiApplier
// Node 타입이 LayoutNode로 고정
// 모든 작업이 방문한 Node(current)에게 위임
internal class UiApplier(
    root: LayoutNode
) : AbstractApplier<LayoutNode>(root) {

    override fun insertTopDown(index: Int, instance: LayoutNode) {
        // Ignored. Insert is performed in [insertBottomUp] to build the tree bottom-up to avoid
        // duplicate notification when the child nodes enter the tree.
    }

    override fun insertBottomUp(index: Int, instance: LayoutNode) {
        current.insertAt(index, instance)
    }

    override fun remove(index: Int, count: Int) {
        current.removeAt(index, count)
    }

    override fun move(from: Int, to: Int, count: Int) {
        current.move(from, to, count)
    }

    override fun onClear() {
        root.removeAll()
    }

    override fun onEndChanges() {
        super.onEndChanges()
        root.owner?.onEndApplyChanges()
    }
}
LayoutNode
순수한 Kotlin 클래스
안드로이드에 대한 의존성 X
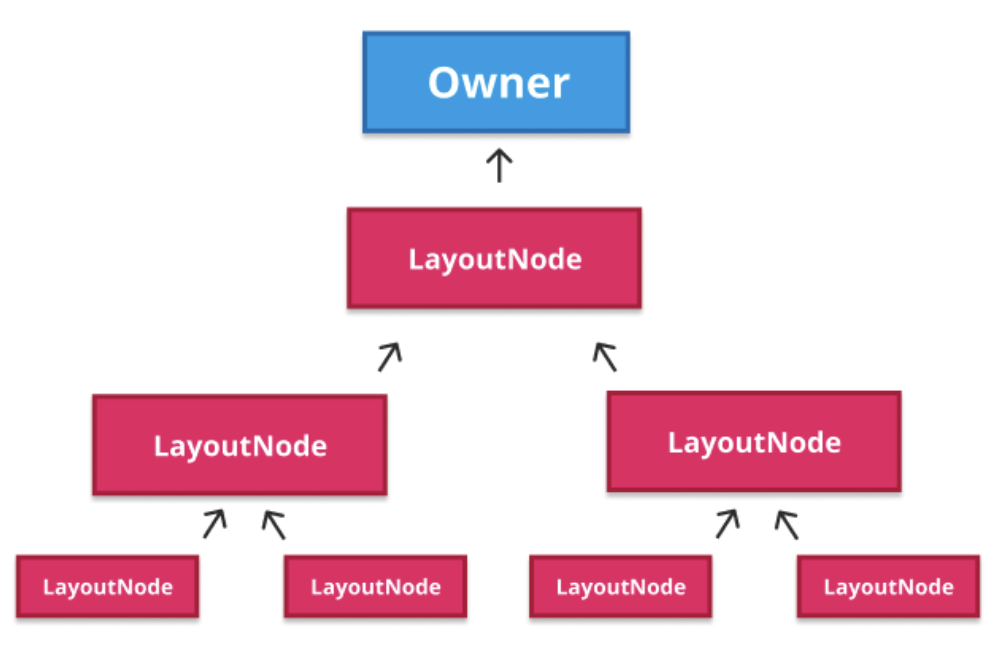
자식 노드들의 목록을 유지하고 자식 노드를 삽입, 제거, 이동하는 작업 제공
트리 구조로 연결되어 각 Node는 부모 Node에 대한 참조를 가지고 모든 Node들은 동일한 Owner에 연결되어 있다
Owner
추상화된 개념으로 플랫폼이 서로 다르게 구현할 수 있다
Android에서는 View(AndroidComposeView)가 Owner
LayoutNode의 insertAt 함수
새 노드가 삽입될 때의 구현
internal fun insertAt(index: Int, instance: LayoutNode) {
    // 새 노드가 있거나 연결되어 있지 않은지 확인
    check(instance._foldedParent == null) {
        "Cannot insert $instance because it already has a parent." +
            " This tree: " + debugTreeToString() +
            " Other tree: " + instance._foldedParent?.debugTreeToString()
    }
    check(instance.owner == null) {
        "Cannot insert $instance because it already has an owner." +
            " This tree: " + debugTreeToString() +
            " Other tree: " + instance.debugTreeToString()
    }

    // 현재 노드가 삽입되는 새 노드의 부모로 설정
    instance._foldedParent = this

    // 새 노드는 새로운 부모(현재 노드)에 의해 유지되는 자식 목록에 추가
    _foldedChildren.add(index, instance)

    // Z 인덱스에 따라 정렬된 자식 목록 invalidate
    onZSortedChildrenInvalidated()

    // NodeCoordinator로 이름 변경됨
    // 노드, modifier, 자식들이 어떻게 측정되고 그려지는지
    instance.outerLayoutNodeWrapper.wrappedBy = innerLayoutNodeWrapper

    // 노드 연결. 새 노드에 부모와 같은 Owner 할당
    val owner = this.owner
    if (owner != null) {
        instance.attach(owner)
    }

    if (instance.layoutDelegate.childrenAccessingCoordinatesDuringPlacement > 0) {
        layoutDelegate.childrenAccessingCoordinatesDuringPlacement++
    }
}
LayoutNode의 attach 함수
internal fun attach(owner: Owner) {
    // 모든 자식 Node가 부모와 동일한 Owner에 할당되도록 한다
    check(this.owner == null) {
        "Cannot attach $this as it already is attached.  Tree: " + debugTreeToString()
    }
    check(_foldedParent == null || _foldedParent?.owner == owner) {
        "Attaching to a different owner($owner) than the parent's owner(${parent?.owner})." +
            " This tree: " + debugTreeToString() +
            " Parent tree: " + _foldedParent?.debugTreeToString()
    }
    val parent = this.parent

    ...

    outerCoordinator.wrappedBy = parent?.innerCoordinator

    this.owner = owner

    this.depth = (parent?.depth ?: -1) + 1
    if (nodes.has(Nodes.Semantics)) {
        invalidateSemantics()
    }
    owner.onAttach(this)

    ...

    _foldedChildren.forEach { child ->
        child.attach(owner)
    }

    invalidateMeasurements()
    parent?.invalidateMeasurements()
    ...
}
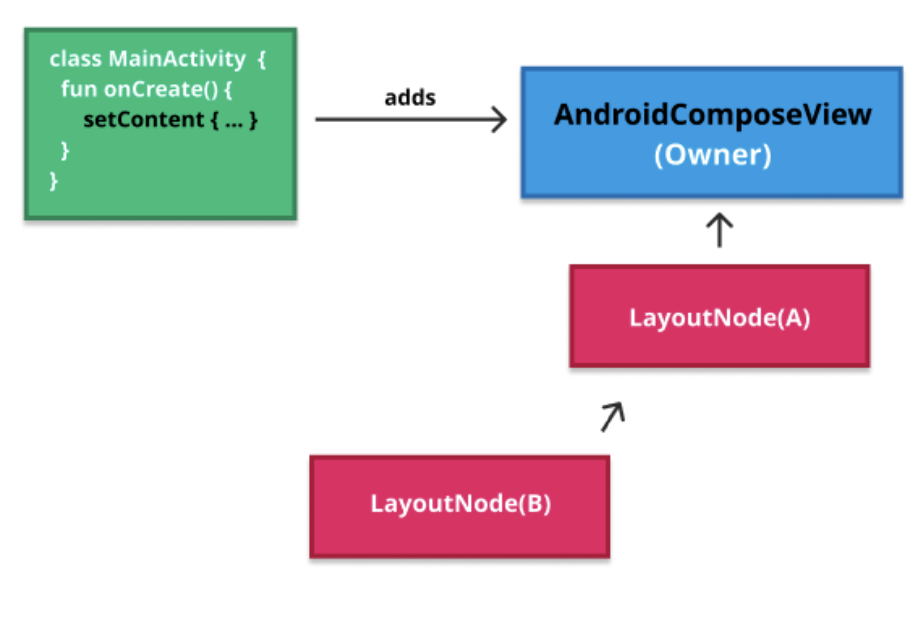
전체 과정의 마무리 (Closing the circle)
최종적으로 Owner는 setContent가 호출되는 순간 View 계층 구조에 연결된다
간단한 예시) Activity setContent -> AndroidComposeView 생성 -> View 계층 구조에 연결
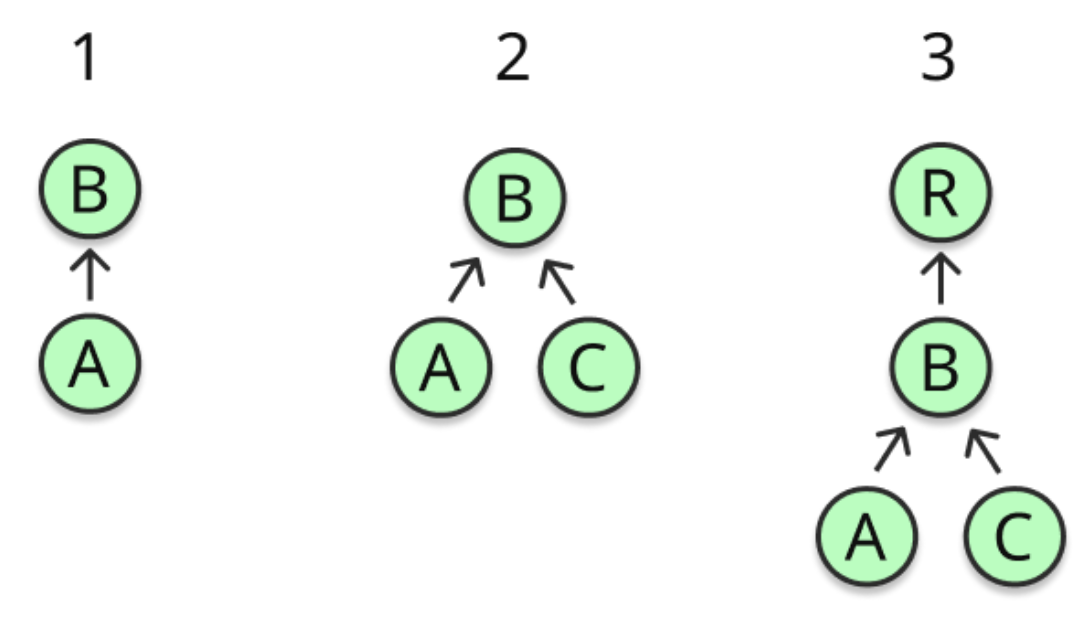
Applier가 새로운 노드 C를 삽입(구체화)하기 위해 insertAt 호출
(새 노드를 연결하는데 Owner를 통해 자신과 새로운 부모 노드에 대한 재측정 요청)
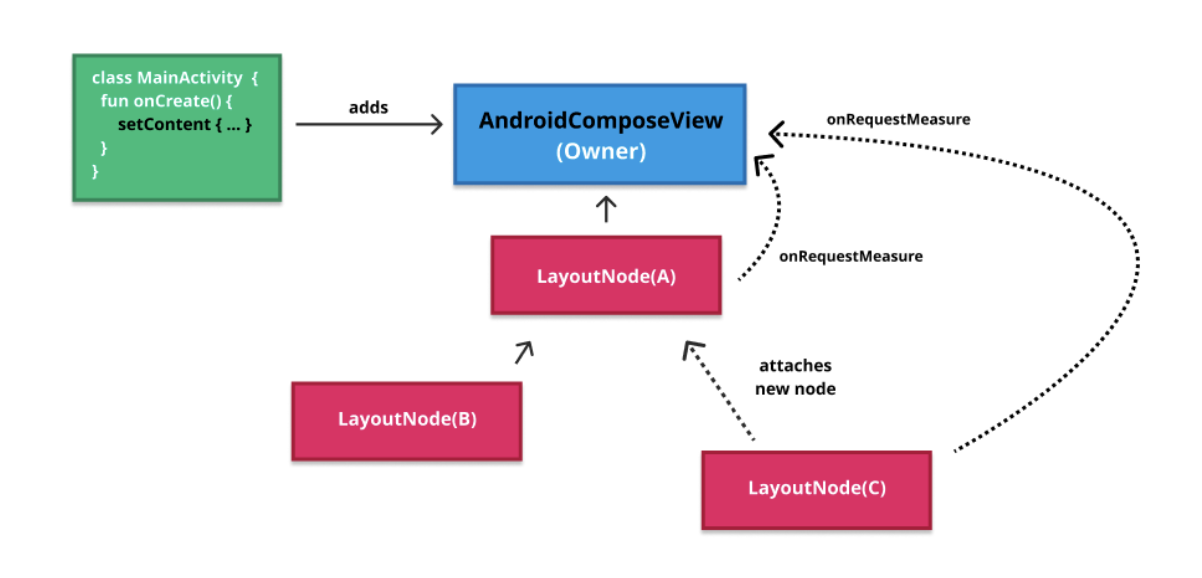
대부분의 경우 invalidate가 호출된다
AndroidComposeView의 dispatchDraw 함수가 호출되고
Compose UI는 여기에서 실제로 모든 요청된 노드의 재측정과 배치를 수행
재측정 중에 루트 노드의 크기가 변경되면 AndroidComposeView의 requestLayout 함수가 호출되고
onMeasure를 다시 트리거해서 모든 형제 View들의 크기에 영향을 끼친다
dispatchDraw 함수 내에서 측정과 배치(View System의 measure과 layout을 의미)를 마치고 루트 LayoutNode의 draw 함수 호출
노드는 항상 먼저 측정되고 그 다음 배치되며 마지막에 그려지는 순서를 따른다
노드 제거를 위한 변경 사항 구체화 (Materializing a change to remove nodes)
UiApplier가 current.removeAt 함수 호출
제거할 모든 Child 순회하고 제거하고 재측정 요청
노드 이동을 위한 변경 사항 구체화 (Materializing a change to move nodes)
자식들의 순서 재배치
UiApplier가 current.move 함수를 호출하고 이동될 노드에 대해 removeAt 함수 호출
노드를 새로운 위치에 추가
현재 노드에 대한 재측정 요청
모든 노드를 지우는 변경 사항 구체화 (Materializing a change to clear all the nodes)
마지막 노드부터 모든 Child를 순회하고 모든 Child를 분리한 다음 부모에게 재측정 요청
'Compose' 카테고리의 다른 글
| [ComposeInternals] 컴포즈 UI (Compose UI) - (3) Layout Constraints (제약 조건) (0) | 2025.04.13 |
|---|---|
| [ComposeInternals] 컴포즈 UI (Compose UI) - (2) Measure(측정) (0) | 2025.04.04 |
| [ComposeInternals] 컴포즈 런타임 (ComposeRuntime) - (3) Recomposer (0) | 2025.03.30 |
| [ComposeInternals] 컴포즈 런타임 (ComposeRuntime) - (2) Composition (0) | 2025.03.30 |
| [ComposeInternals] 컴포즈 런타임 (ComposeRuntime) - (1) Composer (0) | 2025.03.16 |

